Wednesday, February 11, 2015

Dollar Tree Wreath

I absolutely LOVE Valentine's Day colors...They were actually my wedding colors.

One of the crafts that I want to do sometimes during my crafting cycles are home decor. I had bought a 9" wreath that was naked, along with a few bunches of red and white roses, and some heart picks from the Dollar Tree.

I had finished my mini album for Valentine's Day and still wanted to craft something other than a layout or cards---although I have got some birthdays coming up this month---one is actually this week! YIKES!!!

So, I put together a wreath for Valentine's Decor.

It was super easy-you just need a wire cutter for trimming the little branches off of the bunches.

You basically cut, arrange, and weave or stick the picks/branches into the wreath.

How easy is that? It maybe took a half hour.

Not every craft or project needs to cost a fortune to make or take hours of your time. This wreath took under $10 to make!

I hope this inspires you to make something fun!! 

Thanks for stopping! 

Tuesday, February 10, 2015

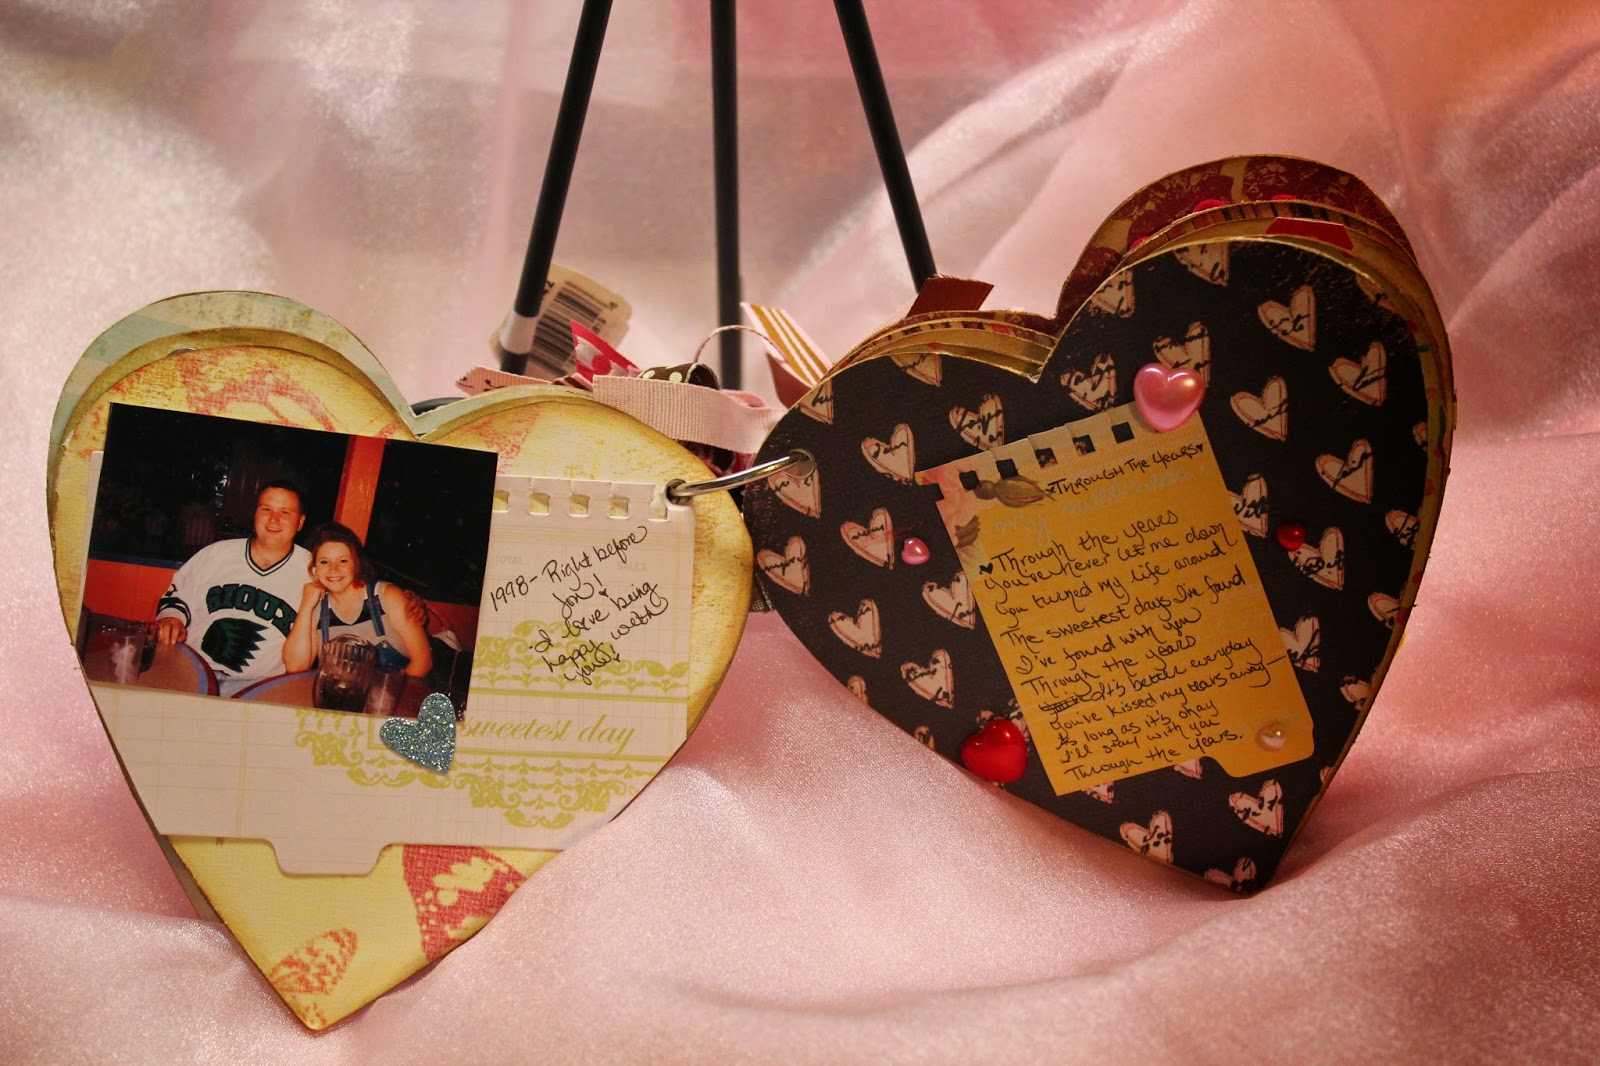
Valentine's Chipboard Mini Album

Four more days until Valentine's Day! It's just all but snuck up on me this year. I'm happy that I did have enough time to create something----although at first, I was not sure it was going to be a Valentine's Day gift. But as I worked on it, I knew it had to be.

We (my hubby and I) are very happy and lucky to be together this year. Last year, we were not as happy and pretty much on our way to a divorce. Thank God for second chances, forgiveness, and what I believe now is True Love. Hmm...sounds corny, but we got through some pretty bad decisions last year and it would have broken a lesser than True Love.

I am going to go right into what I used for this album and then share it after.

I used Pink Paislee's "Sweetness" Collection for most of the mini-album. The items I used from the collection are:
- "Sweetness" Chipboard Album
- "Sweetness" Glitter Sticker Elements (They are the blue ones.)
- "Sweetness" Cardstock Stickers
- "Sweetness" Doodads (They are the felt stickers.)

The paper I used for covering the inner chipboard pages are from the My Mind's Eye by Jen Wilson's "Totally Girl" 180 sheet paper pad.

I also used my bling "stash" for all of the bling and pearl "bling" on the pages.  I used ribbon from my ribbon "stash" for tying to the binder ring. The binder ring was one that you can buy from the office section of Walmart.

The couple of pink notes that you see with "Us" and "Love" on them are from my Heidi Swapp stash. Yes---I have a Heidi Swapp stash---Don't judge!!

On the front cover, for a little extra glitzy-ness, I used "Smooch" metallic accent paints in Snicker doodle and Sassy Pink.

Basically for the album, I found pictures on Facebook and downloaded them to my computer. Then I sized them in Photoshop and printed them. I didn't have enough pictures for the whole album, so I came up with the idea of using some of the songs that remind us of, well---US---on the pages that didn't have pictures. I took parts of the songs and wrote them on the pages and embellished them.

I will lightly explain each page's pictures (i.e. when taken) or lyrics/song-although I'll let the lyrics speak for themselves....if you are able to read my writing.

Front Cover

Picture from Gibson Park- April 2014

Picture from 2014-Before a Date Night
Some lyrics from P!nk's "True Love"

Lyrics from Kenny Chesney's "You Save Me"
Picture is from 20+years ago

Picture from 1998-right before we got pregnant with Jon
Lyrics from Kenny Roger's "Through the Years"

Lyrics from Depeche Mode's "Just Can't Get Enough"
Picture from September 2010

Picture from Summer 2014
Lyrics from P!nk's "Just Give Me A Reason"

Lyrics from One Direction's "No Control"
Picture from 2010 
Pictures from September 2010 and Winter 2014

Picture from Spring 2014

I hope you have a beautiful Valentine's Day! 

Thanks for stopping by! :)

Wednesday, February 4, 2015

"Ice Cream" Sammies

Hey Everybody!

Mentally, I've had a rough couple of days.  Creatively, my heart and mind have been pretty low. Before my "low" hit me, I was working on a mini album for Valentine's Day.

BUT-I have been craving my "Ice Cream" sammies.  Notice the words ice and cream are in quotes? You'll find out why shortly.

These treats are definitely not the healthiest, but they are so good!

I was originally going to vlog this.  If you don't know, a vlog is a video blog. However, with my "lows" right now, it's probably best to stay off camera.

I still wanted to bring this delicious recipe to you.

So, here we go!

What you'll need:

2-cups of heavy cream
4-tablespoon of powdered sugar (Now, I sprinkle a bit more while it is whipping, but you don't need to.)
1-teaspoon or more of vanilla.  This truly depends on you and how much of a vanilla-y taste you like.
1 to 2-boxes of soft sugar cookies.

You'll need a Kitchen Aid with the whisk attachment.  If you don't have a Kitchen Aid, this recipe can also be made with a hand mixer.

You will also need wax paper for wrapping the sammies for the freezer and a 2-gallon Ziploc bag or 2-one gallon Ziplocs.

First, you put the heavy cream, powdered  sugar, and vanilla in the Kitchen Aid/bowl.  Then you start mixing.  Make sure you start at the lowest speed so the ingredients don't go flying.  Once the mixture foams a little bit, go ahead and turn the speed up to a medium high speed.  During this time, you may want to add a little more powdered sugar.

Once the speed is up, you can continue mixing until the mixture is stiff.
Take two of the sugar cookies and lay one upside down.
With a spoon--I used a plastic one, but you can use any type: a wooden spoon, a table spoon, ice cream scoop-whatever you want, and start spooning/scooping the whipped cream on to the cookie. With this, you can judge how much cream you want on there.
After you've scooped as much whipped cream as you'd like o the bottom cookie, take another cookie and place it right side up on top of the cream. Viola-you have your first "ice cream" sammie!
Wrap the sammie with the wax paper.
Repeat the process for the rest of the cookies.  This recipe makes 12 sammies.
Once done, place all of your wrapped sammies into a 2 gallon Ziploc or split them into 2-one gallon bags.

Freeze for 2 to 3 hours and then ENJOY!
Well, there you have it! I hope this recipe inspires you to get into your kitchen.

Thanks for stopping by! :)

Sunday, February 1, 2015

HELLO KITTY!!!

I'm not sure if I can fully express the love I have for Hello Kitty!

I actually completed these cards with my other cards from the previous blog post on Valentine's/Love Cards.  BUT I feel that Hello Kitty deserves her own post.

I have two Hello Kitty Cricut Cartridges.  I have Hello Kitty Font and Hello Kitty Greetings.

On this first card, I used the Hello Kitty Font Cartridge.

The base of this card is Bazzil's Special Occasion paper.  It's got a pearl-like finish.I used an EK Success paper punch on the side.

The rectangular mat is from Papertrey Inc. I rounded the corners with a Becky Higgins corner rounder.

The black base on the Cricut image is Bazzil Bling paper.  I am not sure of the brands of the light and dark pink papers used,  Hello Kitty, herself, is cut with American Crafts cardstock in snow.

The ribbon is Offray.  The black bling is from my bling stash.

This next card was inspired by my best friend's daughter.  Her daughter was a cheerleader for four years at our high school here in town.

The base is basic white cardstock.  The patterned paper is from Basic Grey's "Recess" Collection.

The image is from the Hello Kitty Greetings Cricut Cartridge.  The stars were cut from the George and Basic Shapes Cricut Cartridge with gold, metallic paper.

The "GO GIRL" stamp is from Studio G.

Last, but certainly not least, is an "I Love You!" card.

The base is basic white cardstock.  The patterned paper is from Papertrey Inc. and corner rounded with Becky Higgins' corner rounder.

Both images were cut using the Hello Kitty Greetings Cricut Cartridge, using Bazzil papers.

AND.....there you have it! Three Hello Kitty cards.  They were fun to make!

I hope you liked them and are inspired by them.

Thanks for stopping by! :)

Friday, January 30, 2015

Love & Kisses

I am really liking my creative planning and how the transition from scrapbooking to card making has been so simple for me the past few days.

I thought that since Valentine's Day is a few weeks away that I should try to make some Valentine's Day/Love cards.

With the first three cards, I used the Love Struck Cricut Cartridge.  This was actually the first time I have ever used it. I think it was released in 2010...that's four years I have had it and haven't created with it!

Card #1:

The base for this card was just kraft paper cut at the standard card size.  The patterned paper and the papers used as matting, as well as the paper used for cutting the Cricut image were all scraps--so I am not really clear what company(s) they are from.

The bottom layer on the Cricut image is actually pink.  I used the Tim Holtz Distressed Ink in Vintage Photo with a foam applicator and sponged the bottom layer once the top layer was on.

The wording and the heart in the background are from the set, From the Heart from Tim Holtz's Stamper's Anonymous set.  I used brushed corduroy, and Tea Dye Distress Ink on the heart.  For the background, I used vintage photo, brushed corduroy, and worn lipstick for coloring.

Card #2:
The base for this card is also kraft paper. At the bottom of the front of the card, I punched with an EK Success border punch.

The patterned paper was from my scrap bin.

The ribbon/lace that I put on the top of the card was from my ribbon stash.

Card #3:
This card's base is actually 6x6.  The base, "Kiss" word, and the mat are all Bazzil Bling papers.

I'm not quite sure what paper company the lips are from. LOL!  The three little pink brads are Bazzil Bling brads.

The next three cards are made with some Precious Moments rubber stamps that I found!  I literally have not used these stamps in at least TEN years! What a joy it  was to find them!

All the images were colored with Prismacolor colored pencils.

Card #4:
The base of this card is kraft paper.  I used a Fiskars border punch for the side.  The ribbon is wired ribbon.  The paper I used for matting were all from my scrap bin.

I did distress with Tim Holtz Distress Ink in vintage photo and spun sugar.

Card #5:
This card's base is from kraft paper.  For the bow, I had a piece of scrap lace that was pink and I thought it looked cute on this card.

The patterned papers used were from my scrap bin.  I cut the circles with the Creative Memories circle cutter system.  I did ink the background of the image too.

Card #6:
The base for this card is basic white.  The patterned paper and the black for matting and also the pink piece of paper that is matting the image were all from my scrap bin.

The ribbon is by Offray.  The pearls were from my bling stash! LOL!

Card #7:
The base of this card is cut at 6x6 Bazzil Bling paper.  The square mat was from my stash, but I know the patterned paper was from the Basic Grey "Bittersweet" collection.

The gray paper is Bazzil Bling also.  I used an EK Success border punch on the top and the bottom of the gray strip of paper.  The stamped image is from Ornate Collection ATC stamps from Tim Holtz's Stamper's Anonymous set.  I inked it with worn lipstick and vintage photo Distress Inks.  The two pearl brads are from Teresa Collins' "Fabrications" collection.  The ribbon is from Offray.

Card #8:
This card is special to me.  It's getting mailed to Wyoming for one of my dearest friend's granddaughter.  She is being home schooled and is doing a lesson on Earth Expedition.  She thought it would be nice for her granddaughter to get cards from other places.

I tried to think of what a little girl would like and find cool and this is what I came up with.

The base is made with white card stock.  The black mat is from Bazzil.  The patterned paper is from my scrap bin, but I know it's from Bo Bunny.

The ladybug was cut using the Create a Critter Cricut Cartridge.  All the paper I used on the ladybug was from Bazzil.  The flower on the corner of the card was punched using a flower paper punch with Bazzil paper.  The "You're So Sweet" saying was from a Studio G stamp set.

Well, there ya have it!  I need to find places for these cards to go! I am very happy with how they all turned out.

I am sorry that this post was so long!

Thanks for stopping by!

Wednesday, January 28, 2015

Making a Comeback....

I have to say--I'm slowly , but surely getting back into blogging.  I would really love to get regular again.  Now, more than ever, I need my blog as an outlet.

Along with blogging, being an outlet for me--so is creating...

About four or so years ago creating was HUGE for me.  I scrapbooked, made card, created mini albums, and basically made anything I could think of.  I'm sure there are a lot of things that made me lose the want and need to get my creativity out.

Looking back on when I quit and potential reasons why--things seem like they are truly excuses and it upsets me now that I let people and situations get the best of me and steal something from me that I truly loved.

I've gained a lot of friends through scrapbooking...but with that, I have had some sadness too.

I've actually been lucky enough to work in TWO scrapbooking stores.  One was a local store here in town that brought some awesome people into my life.  I ended up working there to support my addiction.  I met one of my closest friends there.  Unfortunately, my little home away from home was in the same building that was part of a fire a few years back.  The store and a lot of its supplies were ruined by that fire.  My friend ended up leaving and going back home to Wyoming.  She did come up a few times and had some retreats, But all the work that goes into a retreat and the fact that attendance and sales just weren't there proved to be the end of that journey for me.

Although I was saddened by that, I found another friend on Facebook that ran a scrapbook store out of her home.  At first, we had a great friendship and was able to work together and spend time going to dinners, having some girls' nights, playing games, and laughing our butts off.  We actually got our families together.  But-when you have two very strong minded people, who speak their minds, butt heads--it's gonna be catastrophic for a friendship.  The relationship ended with bitterness and no way to mend.

These two things were a major factor in me losing my passion for creating.  There was also really no place to meet friends and craft together anymore.  All of us that were friends either lost touch or got too busy with life to make the time to get together and create together.

I understand getting busy will throw a wrench into your creative mojo, but between finding work and meeting people who didn't share my same passion--I began moving further from it.

Fast forward to the recent couple of years and I just couldn't bring myself to go down to my craft area and create.  Papers, ribbon, adhesive, etc.--all started collecting dust....Apparently my creative self was beginning to get dusty too.

I did have a couple of instances that I would make a birthday card or alter something.  I altered a clipboard that I used for work when I was a cake decorator for Sam's Club....unfortunately, it's still there. :(

But it wasn't until a couple of months ago that I started finding myself getting comfortable in my space again. I actually have a plan to implement until I have my mojo for creating back again.

I am actually VERY behind on my scrapbooking.  So, I'll take a group of pictures and make some layouts.  Once those are done, I move onto making cards.  I'll work on cards for 2 to 3 days and move into crafting with other elements-whether it's making a sign, wreath, etc.

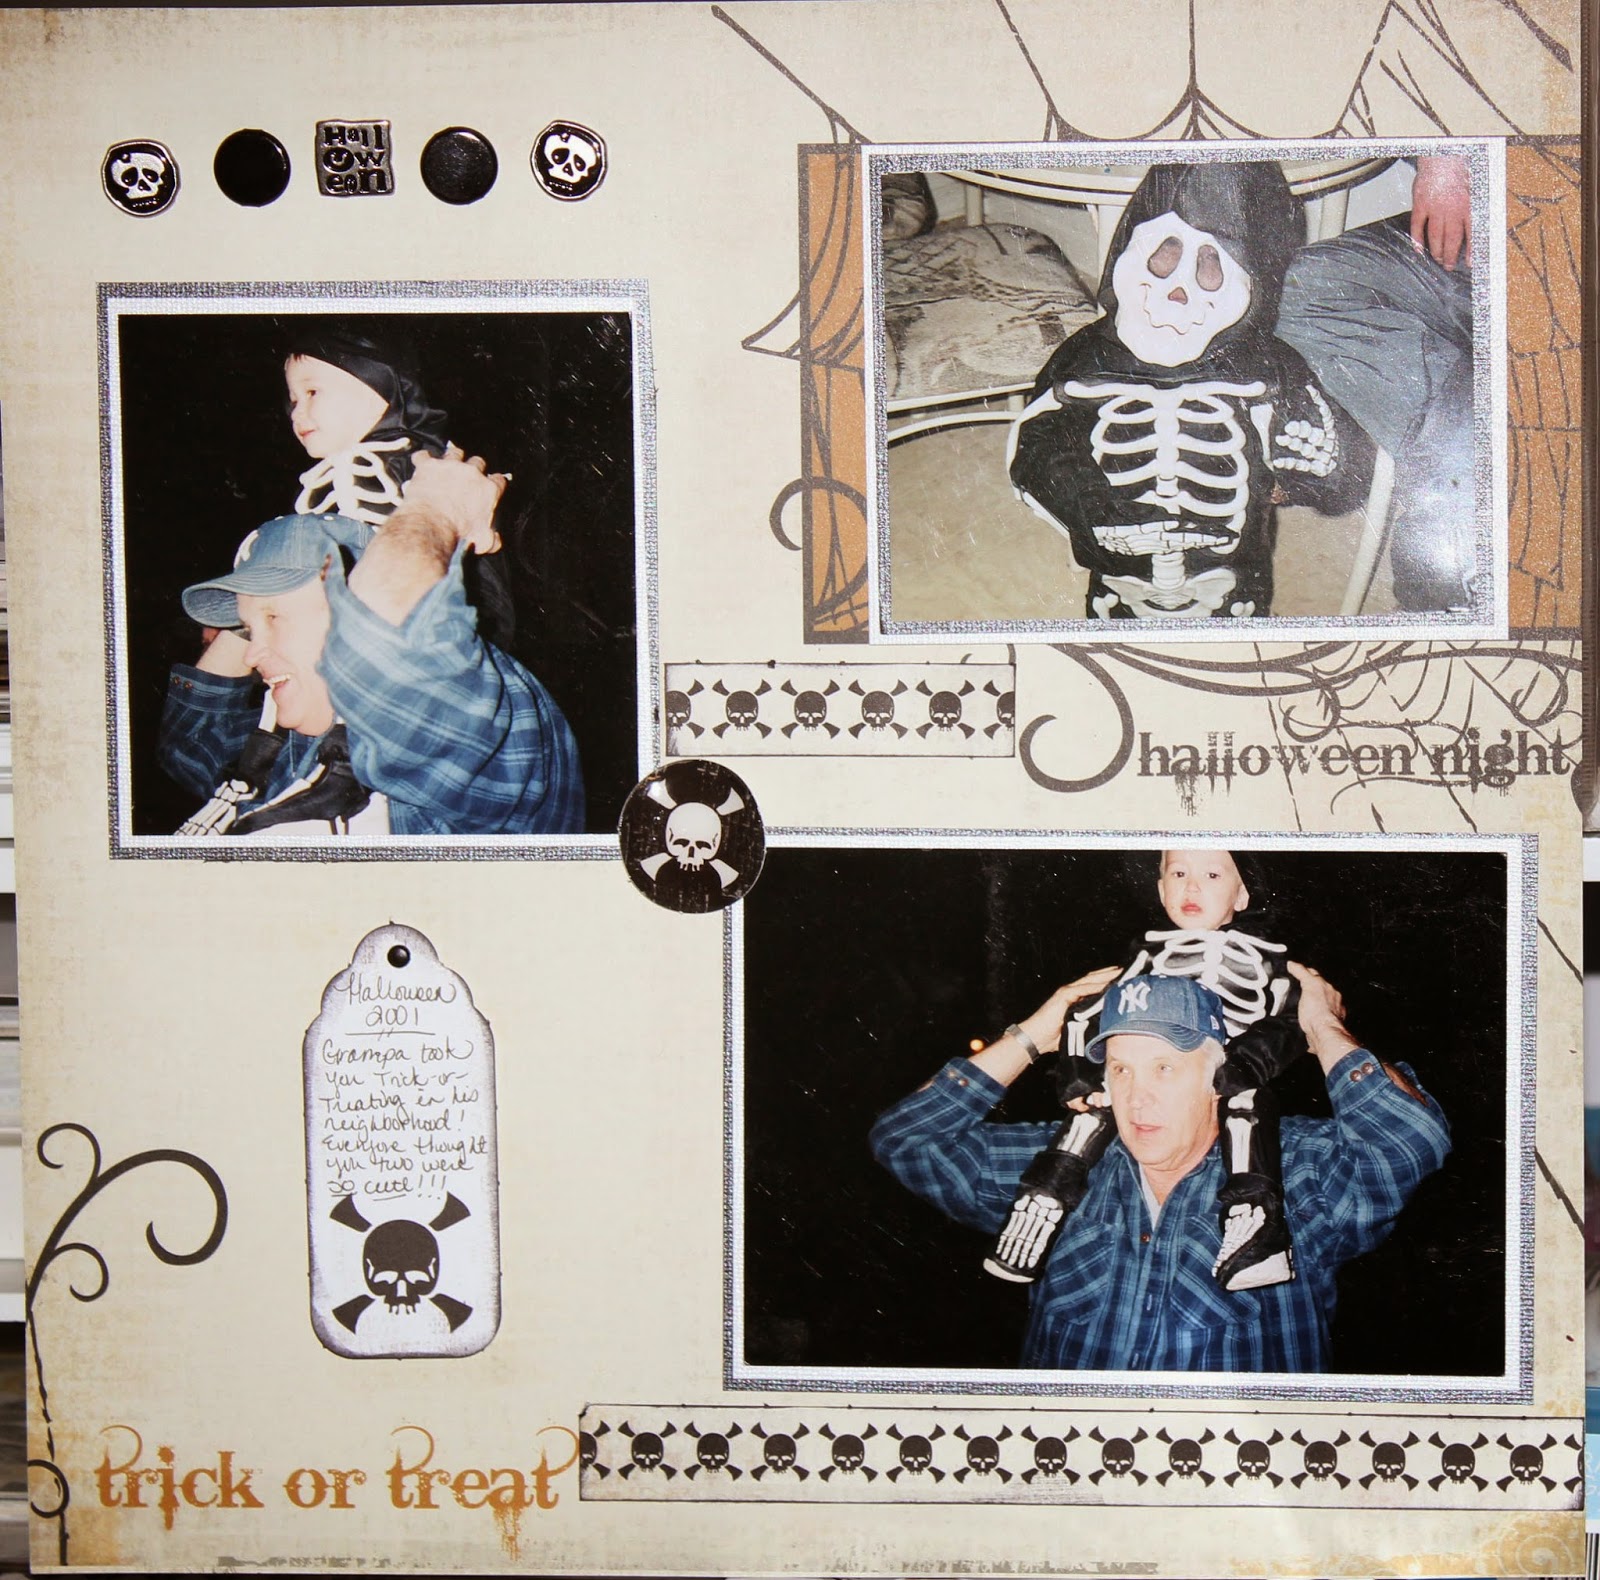
Well, for this time around with scrapbooking, I pulled out some of Jon's Halloween  pictures from 2001! WHAT THE HECK?!?!?!  I was able to make a few groupings to total 4 pages!

All of these layouts were created with the My Mind's Eye Boo to You! and Spider's Web collection. I also used my Cricut---which I have also missed! The cartridge I used was October 31st.

They are a little more simple than I am used to, but it's a start!


Oh, the memories! Remembering Jon that young (He was 2 years old!) feels like it was yesterday.  He's now 15 and growing up way too fast!  I miss these times though.  Who doesn't miss their kids as little ones though?

Well that's it until the next time....which I hope is soon!

Thanks for stopping by and reading! :)

Saturday, January 17, 2015

Sweet Chex Mix and Trying to Start This Up Again!!

Hey Everyone!! Wow! I have been gone FOREVER! A little over two years to be exact! I actually didn't plan on my first blog post back to be a recipe, but it's all good.  I have been wanting to post about things that have happened or are happening now in my life and lessons that I have learned.  What's sad is that every time I try to write the post about that I draw a complete blank.  I think I am trying or thinking too hard with it.  I am not proud of how some of those lessons were learned, but happy that life has turned around.

OK-so let's talk about Sweet Chex Mix!  I had this for the first time at a Bunco Night at a friend's house-YEARS AGO.  I remember the first time I tasted it.  It was like a sweet taste of Heaven in every bite.  Well, for me it was! It's truly easy to make!

Here's what you'll need:


*1/2 cup or 1 stick of butter
*1 cup of light Karo or corn syrup
*1 cup of sugar
*1/2 box of Rice Chex
*1/2 box of Corn Chex
*1 small (2-3oz) bag of slivered almonds
----We have used cashews that we chopped up and that was good as well!----
*1-1/2 cups or more of dried cranberries
*1-1/2 cups or more of shredded, sweetened coconut
*1 teaspoon or tablespoon of vanilla

You will also need a BIG BOWL.  I have a 32 cup Tupperware bowl, a small sauce pan, a wooden spoon, a timer, and 2-3 cookie sheets or trays.


Mix together the Chex cereals, slivered almonds, dried cranberries, and shredded coconut.  I actually use my hands for this process. Mix together and set aside.


In the small sauce pan, melt the butter over medium to medium high heat. 


Once the butter is melted, pour in the Karo syrup and sugar.Start stirring this.  You are going to want to stir constantly.  Once the mixture starts to bubble or boil start your timer and keep stirring for 3 minutes and 30 seconds.


Once the 3 and a half minutes is up, remove the pan from the heat and stir in the vanilla.

Be careful-sometimes the vanilla being poured into the mixture will cause it to pop a bit. After the vanilla is poured in then pour the sugar mixture into the cereal mixture and stir to combine.  


After the cereal and sugar mixture are combined-spread the Chex Mix on the cookie sheets or trays to cool.  


Once the Chex Mix is cooled down (approximately 30 minutes), you can store it in a 2-1/2 gallon Ziploc Bag.

Well, there you have it! I hope you and your family enjoy it as much as my family and friends do! 

I am really going to keep blogging frequently since I have missed it.

Feel free to follow me and comment! :)

See you soon! :)